Weaving on


LOVING the colors of my newest scarf! This is only my third woven item and I'm ok with saying that I'm proud of myself! :)   After being shown by my friend how to weave on a loom and researching, reading tutorials and blogs, watching videos, etc, I wasn't sure if I could handle the complexities of weaving. But taking some step by step directions really helped me-- breaking it down into smaller parts and taking my time really made it seem doable.

I worked out some loom tension issues after my second weaving and this third one came out straight-- hooray!  And this is so darn soft!!!

Warp: 5/2 Egyptian Cotton- Chestnut Rose
Weft: Bulky Cotton Boucle- Moccasin & Light Worsted Cotton Boucle- Egypt-- all yarn from Yarntopia Treasures

90 threads, 10epi, multi-patterns

Made this one for myself and now I'm going to work on some to list in my Etsy shop.

Video tutorial and review: Winding yarn

Below is a short video tutorial and review of some new yarn supplies that I've acquired...

Winding bulky cotton yarn from http://www.yarntopiatreasures.com/ using the "Medium Hard Maple Yarn Swift Winder Adjustable Skeinwinder" from http://www.etsy.com/shop/theknitstore and the "Knitting yarn ball winder" from http://www.knitpicks.com

Review: The swift was extremely easy to assemble and very fluid. I think I should have purchased the next size up (large) because thinner yarns are falling off of the swift but that's my own fault- I didn't know what would work best. I'm positive I can make some simple adjustments to this one to keep that from happening in the future. Really a great swift and at a really great price.

The yarn winder works really well. I've been choosing to use it hand-held because the clamp is taking me some time to figure out how to use. The instructions that are printed on the box don't explain how the clamp attaches without the clamp being in the way of the crank. Maybe I'm just dense but I can't get it to work without these two parts interfering with one another. Overall, it's a great winder.

Now if I could just find a way to get my loom to warp itself....


Weaving scarves on the loom


My new loom
Last month I posted about my new venture: weaving. I've since acquired a Structo Artcraft table loom. The loom is 21" wide so it's perfectly suited to make scarves, placemats, and small rugs or runners. I've started off with scarves and am absolutely loving it!

My 1st scarf - cotton chenille & cotton
2nd scarf - bulky cotton boucle & cotton
I've always been drawn to fiber but didn't quite know how to incorporate it into my art and craft. I have a friend who weaves and she sat me down in front of a floor loom and taught me the ropes, so to speak. A very comprehensive book and many Youtube videos later and I'm throwing that shuttle as fast as I can!

It's a nice break to take from the painting studio and a great thing to do while watching tv. I have my loom set up on the coffee table so that I can be fairly comfortable (if you know of an ergonomic loom, please let my back know!)

The major downfall to weaving is how completely addicting it is! The worst part is all of the beautiful yarn out there!! I've been so enamored with the hand dyed yarn from Yarntopia Treasures-- she will custom dye to your whim or you can choose from her color palettes and/or at hand supply.  I've been using her bulky cotton for my weft (the shorter part of my scarves) and just purchased some thinner yarn to be used in future warps (the long threads that run the length of the scarf.) It's the best and the cotton boucle is so darn soft!!

I'll keep posting my progress-- more very soon!

A new venture

...almost done...

Because I can't stay only on one project and because I can't help but learn new things... I started learning how to make rag rugs!  Inspired by the weaving of an artist I am mentoring- she showed me how to weave on a loom and I was so taken with it!  I'm working on getting a table top loom but in the meantime, I needed to learn how to weave something fast.  

I've always been drawn to rag rugs and decided to research how they were made.  Some google searching and youtube watching later, I found out that I could make my own rug frame. Since I'm a painter, I have a ton of canvas stretcher bars hanging around the studio and they work perfectly! On the shorter sides, I put some nails in one inch apart and then strung some dyed cotton yarn as the warp.  

The piece above is bathmat sized and a good starter project.  I'm going to go bigger and tighter on my next rug and I think I've found a great new hobby!  (I'll post a tutorial soon!)
a view of the warp before I started weaving


Where do you start?

"Talked Into It" casein & wax pastel on arches watercolor paper mounted on cradled board 6 x 6", available here
The other day, my friend, who has known my paintings for a few years, asked me about my process, "Where do you start?" An interesting question that I never had asked of me before! 

Right now in my current paintings I start with a ground color, since I know I'll typically scrape away parts of the painting to reveal it. Then I think about a general color palette, knowing full well that it'll change as I paint. And I just go from there, drawing, painting, scribbling, scraping, layering, until I'm happy with where it lands. Sometimes I draw shapes, sometimes words usually from things I'm thinking or a conversation with myself, or what I'm watching on tv or something my husband says. Sometimes it turns into an inside joke with myself and I name the piece after that.

Anyway-- I'm thinking of all of this as I continue to post my new small paintings in my Etsy shop.

So tell me, where do you start?

What I'm Working On Now


I'm working on some new ways to work and display my work on paper.  I've mounted some heavy duty Arches cream paper on cradled wood panels.  I used archival glue and a brayer to apply the paper and get all the air out from underneath it.  What a soothing process.  And I love the way that they look.  I almost don't want to paint on them!

I'm working on these smaller ones (6x6" and soon to come 10x10") for the December 2nd ArtWalk Gardiner. The larger ones are 8x10" for the 8x10x80 show at the Harlow Gallery.

Today I'm going to paint on them and see what comes to light.  Working on some utilitarian items, too...next post!  :)

Giveaway winners!!!

HOORAY!!! We have winners!  Cue the music!!

Thank you all for entering my giveaway!  And than you for the jokes and being nice!!!!

So here we go.........  The winners are:

Prize: One (1) First Prize winner will have $75 transferred to their new or existing IPFH account
Caroline!!  Congrats, Caro! Now you can get tons of photos of your cutie offspring! :)  Oh yeah, and your awesome photographs & illustrations, too!


Prize: One (1) Second Prize winner will have $50 transferred to their new or existing IPFH account
Bob-o!  Congrats, BOB! I can't wait to see you add your awesome landscape photography to your Etsy Shop!


Prize: Three (3) Third Prize winners will have $25 transferred to their new or existing IPFH account
Winners: #1- Nancy!!  My triplet twin!  Congrats!!! I know you'll have lots of great photographs printed!! Go big!  :)
#2- Bob again!!  Way to use your multiple entries, Bob!!!! It's like you won first prize!
#3- Mary-Anne!  Yeah!  Hooray!! 


OK gang-- so please look for my email to you and reply back with the info that I need and I will transfer some dough into your IPFH account!


Thanks for playing!!!

Giveaway: iPrintFromHome.com dollars

So I've told you all before how much I love ordering my giclee and photographic prints from iprintfromhome.com - It's honestly true.  I don't endorse many companies unless I truly love their product and service.  I actually don't really endorse any companies.  But I joined their Ambassador Program because I truly do believe in their prints and trust them tons.  When someone says that I referred them or click on the link in my blog, I get 'thank you dollars' in my account that I can use to buy myself prints.  I jokingly said to them the other day that I refer to myself as a 'whore for iprintfromhome' to all of my friends but, when I recently checked out the balance in my ambassador account, I'd have to re-title myself as an IPFH 'high class escort.'

I have a ton of dough in that account!  And here's the best part....I want to share it all with you!!!


That's right, I'm holding a giveaway and five lucky recipients will have the pleasure of ordering prints of their own work from iprintfromhome.com!  You can use the credit towards anything they have for sale...canvas prints, mounted giclee prints, giclees, photographic prints- you name it! If you're not an artist that needs prints, no problem, you can order photographic prints of family photos.  View a full list of items and services that they offer here.

Prizes!!  My five prizes will be:
One (1) First Prize winner will have $75 transferred to their new or existing IPFH account
One (1) Second Prize winner will have $50 transferred to their new or existing IPFH account
Three (3) Third Prize winners will have $25 transferred to their new or existing IPFH account

Kinda fine print: There is no cash value. Winners will need to tell me the email address associated with their existing or new iprintfromhome.com account. I will give that email to IPFH solely for them to transfer the credit from my account to yours.

Winners will be picked at random from names drawn on Wednesday September 28, 2011 at 5:30pm Eastern Time.  I will blog the winners and contact them right away.  Please make sure that I have a way to contact you (blogger profile with contact info or include your email/website in your post).

So here's the deal, you can enter this giveaway 3 times!  Do one or all of the following:

  • Post below and say something nice.  Anything nice at all will do! (we all like to hear something nice once in a while)
  • Do something nice for someone you know or a random stranger then tell your story below!
  • Post a joke! We could all use a laugh :)
That's it!  Please feel free to share this link and get your friends in on the action- think about your artist friends.  And if you're so inclined, please check out my etsy shop jamieribisi.etsy.com

*************GIVEAWAY IS NOW CLOSED- look for my next post for winners!**********

Nielsen wood frames

Nielsen Wood Frame Kit - as purchased
Recently, I had 2 works on paper and a painting accepted into an exhibition "In the Shadows of the Mind" at Monkitree Gallery in Gardiner, ME (opening is this Friday, Sept 16th at 5:30pm).  I am beyond excited because these works on paper have never been exhibited in a gallery before and I can't wait to see how they are received.

But I was also very excited and a bit intimidated to venture into the world of framing.  I've framed before but I wanted to find an affordable frame that was easy to assemble and to exactly the right size.  I instantly thought of Nielsen frame kits, you know, the metal frames that many photographers use.  I love their simplicity but I don't like the coldness of the metal next to my paintings or drawings.  So I searched, and searched, and searched.  Nothing was affordable and nothing was exactly the right size.  These particular pieces are 15" square which is a little awkward for store-bought frames.  Then I came across something I was unfamiliar with, Nielsen's wood frame kits!  Exactly the warmth that I wanted, easy to assemble, and from a name that I trust.  They come in 3 colors: black, mahogany, or natural pine.

You purchase the kits by the interior size that you need-- each kit is a set of two sides so you will need to buy two kits per frame that you are looking to make.  In my case, I purchased 2 sets of 15" kits per frame.  (If you want an 8x10" frame you'd buy one kit that's 8" and one that's 10")

how the sides assemble
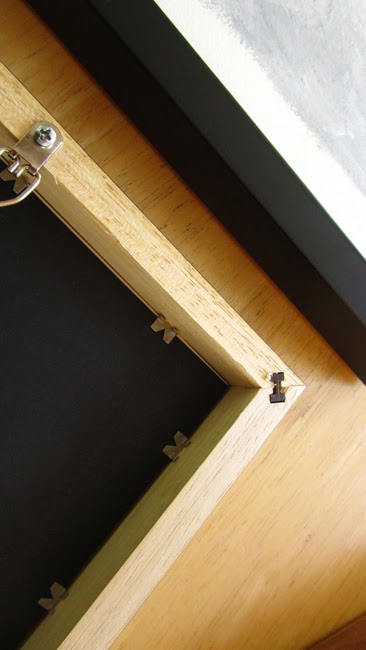
Each kit comes with two H shaped plastic pins that you insert into each mitered corner after putting a small amount of wood glue onto the mitered edges.  I found this fairly simple to do, out of the two frames that I made, one had a corner that didn't exactly match up but with a little finagling it was hardly noticeable.  The pins can be pushed in about half way by hand and then the rest of the way with light hammering of a mallet.

Blogger won't upload this in the correct direction.  What jerks.
So the only other things you'll need are: 1) glass cut to size; don't go by the size of the frame, there will be a fraction of an inch extra on each and I recommend assembling the frames and then measuring the size of glass that you'll need.  Most hardware stores will cut glass for you.  2) mat board; even if you are not showing the mat, you may want to still put it in there for support.  I recommend acid-free.  3) backing board; this will be visible from the back.  I used a thick black acid free mat board that went in after my mat board.  4) glazier points; again, available at the hardware store.  I got the ones that you can see above- they are shaped like a pointy heart and a raised edge on the metal, this makes it easy to push in the point with a flat head screwdriver.  5) d-rings or strap hangers with screws to tie the next item to 6) framing wire.
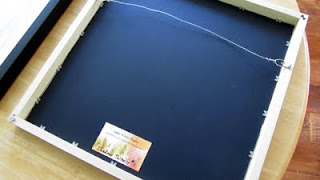
a full view of the back - I glued my business card to the back of the mounting board and wrote my title on it

finished products
And here are the finished products! The black frames did need to be touched up on the edges because you could see the natural color of the wood at each miter point.  Not too bad and easy to correct with a touch up pen.  I placed another order and am waiting for the natural pine frames, I think that'll look even better and not have the need to be touched up.  I'll report back!

Some additional specs:  The 1-1/8" rabbet accepts stretched canvas or matted or mounted art. Has a 3/4" face and 1-1/2" side depth.  Sits very nicely on a wall!

Where can you find the best price on these frames-- glad you asked because I found that out, too.  Jerry's Artarama had the best price I could find.

If you wind up using these or have used them in the past, let me know!  I'd like to know what you think of them.  I still don't love framing but this is inexpensive and relatively easy.

Powered by Blogger.