 |
| Nielsen Wood Frame Kit - as purchased |
Recently, I had 2 works on paper and a painting accepted into an exhibition
"In the Shadows of the Mind" at
Monkitree Gallery in Gardiner, ME (opening is this Friday, Sept 16th at 5:30pm). I am beyond excited because these works on paper have never been exhibited in a gallery before and I can't wait to see how they are received.
But I was also very excited and a bit intimidated to venture into the world of framing. I've framed before but I wanted to find an affordable frame that was easy to assemble and to exactly the right size. I instantly thought of Nielsen frame kits, you know, the metal frames that many photographers use. I love their simplicity but I don't like the coldness of the metal next to my paintings or drawings. So I searched, and searched, and searched. Nothing was affordable and nothing was exactly the right size. These particular pieces are 15" square which is a little awkward for store-bought frames. Then I came across something I was unfamiliar with, Nielsen's
wood frame kits! Exactly the warmth that I wanted, easy to assemble, and from a name that I trust. They come in 3 colors: black, mahogany, or natural pine.
You purchase the kits by the interior size that you need-- each kit is a set of two sides so you will need to buy two kits per frame that you are looking to make. In my case, I purchased 2 sets of 15" kits per frame. (If you want an 8x10" frame you'd buy one kit that's 8" and one that's 10")
 |
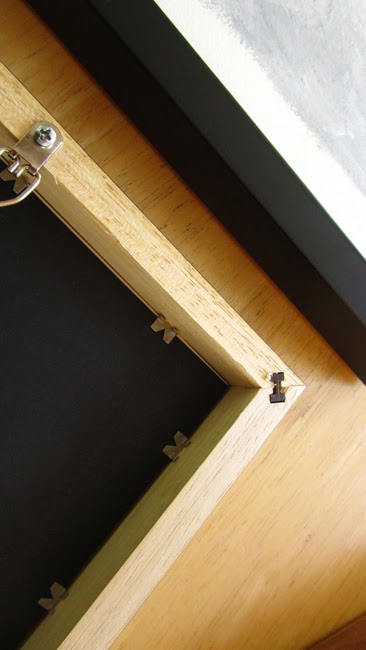
| how the sides assemble |
Each kit comes with two H shaped plastic pins that you insert into each mitered corner after putting a small amount of wood glue onto the mitered edges. I found this fairly simple to do, out of the two frames that I made, one had a corner that didn't exactly match up but with a little finagling it was hardly noticeable. The pins can be pushed in about half way by hand and then the rest of the way with light hammering of a mallet.
 |
| Blogger won't upload this in the correct direction. What jerks. |
So the only other things you'll need are: 1) glass cut to size; don't go by the size of the frame, there will be a fraction of an inch extra on each and I recommend assembling the frames and then measuring the size of glass that you'll need. Most hardware stores will cut glass for you. 2) mat board; even if you are not showing the mat, you may want to still put it in there for support. I recommend acid-free. 3) backing board; this will be visible from the back. I used a thick black acid free mat board that went in after my mat board. 4) glazier points; again, available at the hardware store. I got the ones that you can see above- they are shaped like a pointy heart and a raised edge on the metal, this makes it easy to push in the point with a flat head screwdriver. 5) d-rings or strap hangers with screws to tie the next item to 6) framing wire.
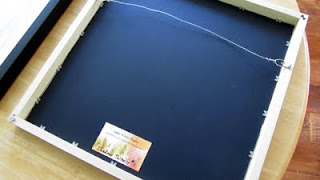 |
| a full view of the back - I glued my business card to the back of the mounting board and wrote my title on it |
 |
| finished products |
And here are the finished products! The black frames did need to be touched up on the edges because you could see the natural color of the wood at each miter point. Not too bad and easy to correct with a touch up pen. I placed another order and am waiting for the natural pine frames, I think that'll look even better and not have the need to be touched up. I'll report back!
Some additional specs: The 1-1/8" rabbet accepts stretched canvas or matted or mounted art. Has a 3/4" face and 1-1/2" side depth. Sits very nicely on a wall!
Where can you find the best price on these frames-- glad you asked because I found that out, too.
Jerry's Artarama had the best price I could find.
If you wind up using these or have used them in the past, let me know! I'd like to know what you think of them. I still don't love framing but this is inexpensive and relatively easy.


Thanks Jamie. I'm going to see a friend in Ct. Every time I go I get to Jerry's ArtaRama in Hartford and this will certainly point me in the right direction. (their bricks and mortar store is wicked fun to browse).