Showing posts with label tutorial. Show all posts

DIY tutorial: COVID protective barriers


Brian and I made two light-weight plexiglass barrier shields for COVID-safe Girl Scout cookie booths! They cost about $30 each in materials at this size. 

The idea is that they are freestanding but they can also be clamped to the table for wind. They are 28x30 plexi with a 3” opening to slide their cookie orders through — I’m calling that the “Covid Cookie Connector”. 


Material list (makes two barriers):

*2 pieces 28x30” plexi (~$19 each)

*one 8 foot length aluminum angle 1/16 x 3/4 (from hardware store sheet metal section) (~$11)

*machine combo screw/nut round #6 32 x 3/8” (10 per screen: 1 box of 100 ~$5)

*drill with a corresponding drill bit for selected screws; optional reamer bit 

*phillips head screwdriver

*hacksaw

*measuring tape

*marker 

*sandpaper

*scrap wood for drilling block

*safety goggles, duh

sheet metal section
This is what the sheet metal section looks like.


Step 1: 

Take your 8 foot length of aluminum and measure & mark four (4) 16" lengths and four (4) 8" lengths. Use your hacksaw to cut these marked lengths.  

Remember, this is making two barriers. If you're only making one barrier, use a 4' length to start and cut half the amount of pieces. This is full customizable to any size or amount needed -- Play around and have fun!


Step 2: 

We're going to start drilling holes for feet -- for the left side, put the end of one 16" length perpendicular to the center of one 8" length. *Keep in mind that you want the foot (8") to have its L angle facing like a proper L for this side.  The interior upright 16" length should have one side touching the interior outer edge of the foot and its other side furthest away from you. With these sandwiched together on the side and on top of your scrap wood, drill a hole in the center of their meeting point.  Attach screw from the outside and nut on interior.

Repeat MIRROR IMAGE orientation with to create the right side. 


Step 3: 

We're going to start drilling holes through the side uprights to hold the plexi on. We wanted to have a pass-through opening on the bottom that would fit a box of Girl Scout cookies so we gave a 3" clearance.

From the bottom of both 16" uprights, on the L angle furthest from you, measure 3" upwards and mark with a line, continue to measure up every 3" with a dot in the center of the aluminum. Repeat on the right side aluminum.  

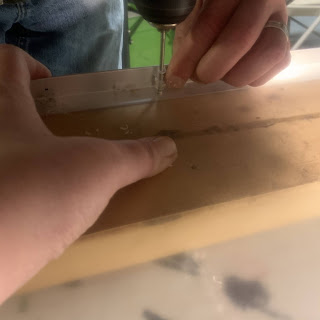
Peel protective film from left and right side of plexi, front & back. Put wood blocks under each metal side, then lay your plexiglass flat on top of marked legs, with the bottom edge sitting on the line drawn towards the bottom.  You will now drill through the plexiglass and the aluminum at the same time- hold tightly and drill, using a reamer to give yourself a cleaner hole.

Insert screws from the customer-facing edge (easier to do when you hang it over the edge of your table and screw from the floor upwards) and your nuts on the interior side that you drilled from.

Repeat on other side.

You're done! Just peel the rest of the protective film off and you're ready to use it!


I added green painter's tape to the edges to make it more visible and a clear indicator that your girls are taking precautions.  Have them decorate it with your troop number, sales pitches, and cookie images!

If you know of local Auburn/Mechanic Falls/Poland/Minot Maine businesses that would like to host us for a drive thru COVID-safe Girl Scout cookie booth in April, please let us know! Or if you’d like a virtual party for your business, let us know! We do contactless drop off throughout the local area.

Using Caran d'Arche Neocolor II pastels

Caran d'Arche Neocolor II water soluble wax pastels

I've been asked a few times to explain what these wax pastels are that I've been using lately.  They are Caran d'Arche Neocolor II water soluble wax pastels, also called Aquarelle Artist Pastels.  Now, be sure that you're buying Neocolor II and not I-- Neocolor I pastels are water resistant.  they still do very cool things but under different circumstances and with different media.  I've been using the NII pastels in mixed media pieces, mostly with casein and acrylic paint.  


In the images above, I simply scribbled some NII into the areas that I wanted to use as a thin paint. The pigment in the pastel is so concentrated that it really works well either on its own or blended into other paint.  If you're working on top of casein, the water will reactivate the paint and your colors will blend.  If you are working on top of acrylic, as I am here, then you will make semi-transparent layers of paint on top of your color.  Use it on its own for a nice underlayer of color.

You can also lay down some paint and, while it's wet, use the NII to scratch into the paint to reveal the colors underneath. Vary the heaviness of  your hand to reveal deeper layers.  Things get interesting when the color from your NII is left behind in your marks.  If you want to increase the likelihood of this happening, wet your NII before drawing. 

 
I like to paint/draw/paintover/draw/paintover/draw/paintover ... until I feel like it's done.  This is the beginning of a small painting I'm working on but thought it was ok enough to share for purposes of explaining the Neocolor II pastels.  

It's hard for me to pass up a colorful art supply I come across-- I'm glad that I picked these up to experiment with!

The Chicken Chick

Nielsen wood frames

Nielsen Wood Frame Kit - as purchased
Recently, I had 2 works on paper and a painting accepted into an exhibition "In the Shadows of the Mind" at Monkitree Gallery in Gardiner, ME (opening is this Friday, Sept 16th at 5:30pm).  I am beyond excited because these works on paper have never been exhibited in a gallery before and I can't wait to see how they are received.

But I was also very excited and a bit intimidated to venture into the world of framing.  I've framed before but I wanted to find an affordable frame that was easy to assemble and to exactly the right size.  I instantly thought of Nielsen frame kits, you know, the metal frames that many photographers use.  I love their simplicity but I don't like the coldness of the metal next to my paintings or drawings.  So I searched, and searched, and searched.  Nothing was affordable and nothing was exactly the right size.  These particular pieces are 15" square which is a little awkward for store-bought frames.  Then I came across something I was unfamiliar with, Nielsen's wood frame kits!  Exactly the warmth that I wanted, easy to assemble, and from a name that I trust.  They come in 3 colors: black, mahogany, or natural pine.

You purchase the kits by the interior size that you need-- each kit is a set of two sides so you will need to buy two kits per frame that you are looking to make.  In my case, I purchased 2 sets of 15" kits per frame.  (If you want an 8x10" frame you'd buy one kit that's 8" and one that's 10")

how the sides assemble
Each kit comes with two H shaped plastic pins that you insert into each mitered corner after putting a small amount of wood glue onto the mitered edges.  I found this fairly simple to do, out of the two frames that I made, one had a corner that didn't exactly match up but with a little finagling it was hardly noticeable.  The pins can be pushed in about half way by hand and then the rest of the way with light hammering of a mallet.

Blogger won't upload this in the correct direction.  What jerks.
So the only other things you'll need are: 1) glass cut to size; don't go by the size of the frame, there will be a fraction of an inch extra on each and I recommend assembling the frames and then measuring the size of glass that you'll need.  Most hardware stores will cut glass for you.  2) mat board; even if you are not showing the mat, you may want to still put it in there for support.  I recommend acid-free.  3) backing board; this will be visible from the back.  I used a thick black acid free mat board that went in after my mat board.  4) glazier points; again, available at the hardware store.  I got the ones that you can see above- they are shaped like a pointy heart and a raised edge on the metal, this makes it easy to push in the point with a flat head screwdriver.  5) d-rings or strap hangers with screws to tie the next item to 6) framing wire.

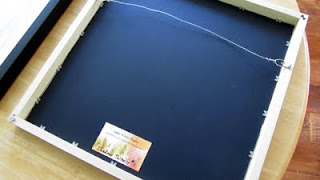
a full view of the back - I glued my business card to the back of the mounting board and wrote my title on it

finished products
And here are the finished products! The black frames did need to be touched up on the edges because you could see the natural color of the wood at each miter point.  Not too bad and easy to correct with a touch up pen.  I placed another order and am waiting for the natural pine frames, I think that'll look even better and not have the need to be touched up.  I'll report back!

Some additional specs:  The 1-1/8" rabbet accepts stretched canvas or matted or mounted art. Has a 3/4" face and 1-1/2" side depth.  Sits very nicely on a wall!

Where can you find the best price on these frames-- glad you asked because I found that out, too.  Jerry's Artarama had the best price I could find.

If you wind up using these or have used them in the past, let me know!  I'd like to know what you think of them.  I still don't love framing but this is inexpensive and relatively easy.

How to prep with Oil Ground

I've been working on cradled wood panels lately and thought I'd share some quick & dirty instructions on how to prep a board with oil ground. First step is taping off your edges with a thick painter's or drafting tape. I like having the natural wood as my clean edge, you can choose to prep and paint your edges, if you wish, but I like the look and feel of a crisp clean edge. Any excess tape I just fold around the back of the panel since you're just going to take this off when you're done painting anyway. Be sure that the tape edge facing the front of the panel matches up to the edge and that you press it down hard. I've learned the hard way-- don't settle for cheap tape!! It either won't stick and you'll have paint seeping through everywhere or it'll stick too much and literally pull pieces of your wood off...I never thought that was a possibility but it is!


Above is a look at my panels all taped up.

I like using Gamblin Oil Painting Ground (they have a pretty cool video there and tons of technical info if you want to read further). Now, don't get confused... oil ground is very different from gesso. Gesso that is commonly used today is an acrylic base; oil ground is linseed oil based. Acrylic gesso is good, quick, and pretty nice but oil ground trumps it for me because oil ground has a luminosity that really shows through your paint. Since I'm painting in fairly thin layers, I want a ground that will showcase the colors that I've mixed. Oil ground also requires less application of layers and less material so don't be fooled by the price when compared to gesso. If you're prepping on canvas or linen you'll need to size the material, first, with PVA or your choice of sizing. Since I'm painting on wood, there is no need to size.
The only materials that you really need for this job is your painting surface, oil ground, latex gloves, a stick of some sort (I use an old pencil), and an old credit card or gift card. I emphasize old because you're not getting it back from the oil Gods. "Why a credit card," you say? Do you think I'm not going to explain, I will, I will. Oh, and open a window, damn it! This is oil based so you need to properly ventilate your studio.
So put on your gloves and take that pencil/stick and dunk it into the pot of oil ground and then drizzle it all over your surface. It's ok if you put too much on, you can always scrape it off and put it back in the pot during the next step, which is my favorite step.
Take the old credit card and use that to scrape the paint really thinly over the entire surface. A new painting tool!! How cool is that? Be sure to keep the bottom of the card clean in between swipes once it gets a little cakey-- just wipe it off on a towel. A credit card or an old gift card or an old forgotten to be returned hotel room keycard (I swear I thought I returned it) work great because you can put even pressure on it, it's flexible, and you don't have to pay for it! You can also use a roller or a flat sponge brush or something but I really love using the cards for a smooth finish.


Keep doing this until your entire surface is covered with oil ground in a very thin coat. You'll be amazed at how little you use. Let dry for about a day and then put on a second coat in the same way. You can sand with a super fine sandpaper and dust between coats if you'd like a very smooth surface. Let your second coat dry for at least 2-3 days; remember, this is oil paint so it will take some time to completely dry. Then you're ready to paint!

Once your painting is complete, simply remove the taped edges pulling the tape towards the front of the painting.

An extra optional step: If you like having a color to your ground, you can mix any dry painter's pigment into the ground first! Customize the color ground you want to use.

And a word of advice: to keep your can of ground lasting a long time, cut a piece of wax paper to the width of the can and place it on the top of the oil. That'll keep the air in the can from drying it out. Then seal it tightly. This also works for home paint and is a tip I probably learned from This Old House. (If it's latex or acrylic paint, then use a piece of plastic wrap to do the same trick.) I am all about saving you money.

Let me know if you have any questions!


Introductory Sale - PDF Tutorial- Making oil paint by hand


To celebrate the release of my new oil paint making tutorial-- I'm putting it on sale for a limited time for $2 -- you can't beat that with a stick (unless you are cruel).  


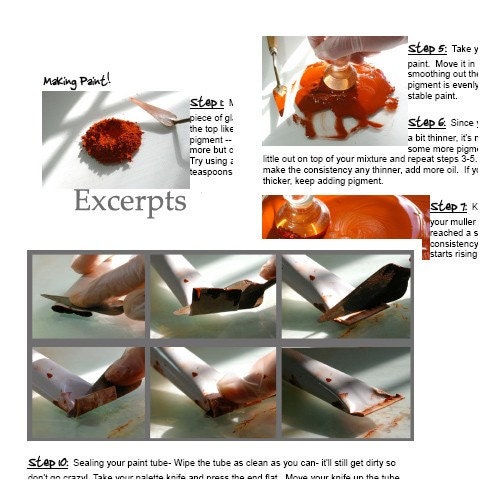
Ever wonder what goes into making a tube of oil paint? Then this tutorial is for you! Learn how to make your own oil paint from scratch! Read about the different properties of various oils and what would work best for you as an artist. Making your own paint can save hundreds of dollars a year on supplies and is a technique that is much easier than you think! 

This 6 page PDF tutorial is easy to read and filled
 with clear photos of each step in this process.
 Includes a complete list of materials, step by step instructions, and a list of supply resources with tons of money saving suggestions!

Normally priced at the already low price of $3.50, you just can't go wrong with this deal.  On sale until midnight EST March 25, 2009.

What are you waiting for?  Buy it already and quench your curiousity!

PDF will be emailed to you right away-  buy it at JamieRibisi.etsy.com or right here: 


...

GIVEAWAY~ Enter to win a free "Hot Mess" tutorial


Enter for your chance to win a free tutorial: "Hot Mess Painting with Wax, an introduction to encaustic painting -PDF Tutorial"

To learn more about the tutorial, click here.
~~~~~~~~~~

How to enter for your chance to win!...

+ post here with your favorite item from my Etsy Shop: JamieRibisi.etsy.com


If you would like an additional chance to win…

+ blog about the giveaway, come back, and post a second entry with a link to the post
~~~~~~~~~~
Entries will be accepted until Thursday February 5th, 2009 at 5:00pm
.
I will use a randomizer to pick my winner an announce them on my blog!  Please be sure that you leave a way to contact you!  (I will only use the info to contact the winner)
.....


***Update: Giveaway has ended- comments are now closed.***

still working

Still working on my oil paint making tutorial.  I'm having fun typing this up and am looking forward to releasing it!  Head is a bit spinny today, much like this paint, so I don't have much to report on-- Off to bed to feel better for tomorrow.

Making Oil Paint by hand!

March 10th 7-9pm- Oil Paint Making demo at the Harlow Gallery in Hallowell, taught by your very own Jamie Ribisi (That's me!)!

Ever wonder what goes into making a tube of oil paint? Come and participate in a hands-on demonstration where you will learn how to make your own oil paint from scratch! Discuss the different properties of various oils and what would work best for you as an artist. Making your own paint can save hundreds of dollars a year on supplies and is a technique that is easier than you think! 

Come watch, learn, ask questions, and leave with all the knowledge you need to start making your own paint!

This event is free and part of the Art Talk series held at the Harlow Gallery, 160 Water St, Hallowell. Sponsored by the Savings Bank of Maine.


_____
Today I made a tube of oil paint in preparation for this demo that I'm going to be giving!  I've been making some of my own oil paint for some time now, it's such a great treat to use paint that you've made by hand!  I'm going to be making a PDF tutorial on this, as well, which will include lots of resources of where to buy the supplies and how to save money.  I'll post it here once it's ready-- of course!....

Hot Mess: Painting with Wax, an intro to encaustic painting tutorial


JUST RELEASED!
Hot Mess: Painting with Wax,  an introduction to encaustic painting PDF Tutorial 

-Want to learn encaustic painting but don't know a darned thing about it? 
-Maybe you're wanting to learn more before diving in and buying supplies? 
-Or perhaps you just love learning?

Then this is the tutorial for you! Learn everything you need to know about painting with beeswax! From set-up to clean-up. It couldn't be easier.

This
6 page tutorial is written in a joyful voice that is very easy to understand with clear photographs showing you every step of the process. Includes a handy supply list with detailed information and tips on where to find the items inexpensively! This intro will walk you through buying supplies, setting up, basic encaustic painting, fusing, embedding objects, clean up, caring for your paintings, and a list of supply resources.

**What's encaustic painting?** Encaustic painting is the use of beeswax and damar resin melted together and combined with dry pigments to create a painting medium. This paint is applied hot (not a cold paste) and manipulated with a direct heat source. This makes for a lovely layered image into which objects and photographs can be added. If you've seen a Jasper Johns painting then you've seen an encaustic painting!

I am always available & happy to answer any questions that you have about painting!


Find this and forthcoming tutorials in my Etsy Shop: JamieRibisi.etsy.com

...

Powered by Blogger.